Yes, the materials matter. I'll explain why at the end of the recipe.
 |
| Dry Ingredients only in a big Bowl |
Put on gloves. Mix all the mandatory dry ingredients in the large bowl. You can use a wisk, or you can just use your hands. I preferred my hands.
Get your drop space ready. Either pack a box with quilting cotton and put a paper towel over it, or put a soft towel on a tray.

Grab your glass bowl, scoop 2 cups of dry mix into it. IF you want to add cornstarch, add a 1/4 C do the bowl now and mix thoroughly.
 |
| 2 cups in a glass bowl |
SIDE NOTE: Cornstarch is optional. It has some benefits and some drawbacks. Benefits: it is easier to mold the bombs, they look prettier, and the color looks richer. Some people also like the way cornstarch affects the water, giving it a "soft" feel. Drawbacks: if not compressed correctly or if too wet, the bath bombs will crack as they dry. And cornstarch is a sugar; if you deal with yeast or bacteria infections, cornstarch will feed it.
Now you need your wet ingredients, optional and mandatory.
 |
| Food Coloring, doTERRA Coconut Oil, Water Spritzer |
Add 10 drops of DoTERRA Essential Oil(s) of your choice, two drops of food coloring, and a squirt of DoTERRA Fractionated Coconut Oil. Mix by hand until crumbly and colored.

Now comes the hardest part: getting it wet. Make sure you are using a SPRITZER BOTTLE, not a SPRAY BOTTLE. You will get vastly different results.
Spritz your mixture twice and mix. Repeat. This is the part you just have to get a feel for. Depending of your geography and humidity, you will need more or less water. If your mixture gets too wet, it will activate the citric acid and start to fizz, ruining the mixture. If it's too dry, it won't hold to the mold. Spritz and mix until the mixture will hold form after you squeeze it in your hand (See large photo below). It still needs to be a tiny bit crumbly, otherwise it will crack as it dries. Cornstarch makes it a little harder to tell, because the cornstarch will make it all pack easier.
CONSISTENCY TIPS: if your mixture is too dry, spritz and mix. If your mixture is too wet, QUICKLY add a bit of cornstarch and mix thoroughly.
Now, the molds!
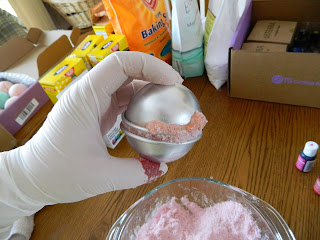
The more you can pack, the better the final bomb will be (within reason). This is why you need a metal mold. Scoop and finger-pack each half of the bomb mold separately. Make sure there is a bit of a mound on the top of each half.

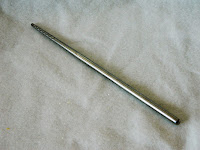
Now squish them together as hard as you can. DO NOT TWIST. Use the palms of your hands, squish evenly, and if there is more than you can squish out between the halves, that's not a bad thing; that's good! Use your chopstick or stick to scrape the excess out of the seam.
 |
| Before Scraping |
 |
| My Scraping Tool (Metal Chopstick) |
 |
| After Scraping |
I discovered that it doesn't matter how long you push, but how hard. If the two halves touch quickly and easily, there isn't enough packed in there. Drop it out, mix it back in, pack more in.
After you've packed it, gently pull one half of the mold straight up and off the bomb.
Then turn it over onto a soft towel or cotton box and gently pull the second half of the mold off of the bomb.
Ta-Da! Now let it dry for a few hours. At least 4 hours without moving it or the box for best results.
When your bowl is nearly empty, if you don't have enough to pack thoroughly into your mold, either try a half bomb, or hand molding it. DON'T try to make a bomb that is loosely packed, it will crumble. If all fails, just throw it away. It's very little.
So, you've used 2 cups of an 8 cup mixture. What now? Throw away the gloves, wash the bowl and molds, DRY THOROUGHLY. Put on new gloves, get two more cups of dry mix in the dry glass bowl, and start from the wet ingredients again! Make a different recipe, or make the same one again. Total, this makes about 12-20 bombs, depending on the size of your mold.

TROUBLESHOOTING
These are some of the problems I ran into while making bombs, and the reasons/solutions.
Orange: That is what happens when the ball isn't packed hard and even. But it doesn't always crack until it's partially dry and too late to repress. It's still good, though. Crumble into a jar so you can pour it into a bath.
Pale Yellow: Flat surface dry. I didn't discover this until I'd made about 50 bombs. Not every bomb will get a flat bottom when dried on a flat surface, but a lot of them did. Dry in a soft cotton bed instead. (Note: some blogs I read suggested using an egg carton, but I had problems with bombs sticking to the cardboard).
Pink: Cracking is what happens when the ball is too wet when packed. It's similar to what happens when the ball isn't compressed enough. That one didn't fall apart, though. My balls with cornstarch did not fall apart, but they all cracked. I still can't get the water right with cornstarch in the mix. Maybe I'll figure it out after another hundred bombs.
Fizzing

If you hear sizzling or hissing, or see fizz like this, STOP AND REMOVE IMMEDIATELY.
In this case, there was water under the rim of the outside of my mold as I was packing it. It started fizzing, so I scraped it off. But some fell into the bowl. I had to stop and pull that out too.
Do not mix fizzed powder back into the rest! The citric acid has already been activated, and it will cause imperfections in the ball.

Like this.
Also, don't try to re-wet mix and add it to new stuff. You get a crumbly ball like this one.
Now, the FAQ's
Why glass and metal only?
The oils will soak into plastic. This means your bowl will forever smell like your oils, and it will diminish the oil in your bombs, making the bomb less fragrant and effective. The plastic will also deposit a little bit of the oils into everything you make after that. Use glass, or metal if you have to. Glass is definitely the best result.
Why can't I use a regular spray bottle?
See the part about fizzing. I couldn't get a spray bottle to spray little enough to not fizz, which ruined a lot of mix. Use a spritzer; it's worth it.
Do I really need gloves?
Yes. Your skin has oils on it that can mess up the mixture, and it's really annoying to get this out from under your fingernails. Also, these oils are wonderfully absorbed through the skin, which means YOU could absorb a lot of oil in a short amount of time, which also means less oil in the bath bombs.
Why Food Grade?
The general rule, especially in an allergy household, is that if you can't put it in your body, it probably shouldn't go on your body, and if you don't like it on your body, you probably shouldn't put it in it. Food Grade Citric Acid and sodium bicarbonate (Baking Soda) produced the best results, anyways. They were finer grained.
Why Extra Fine Epsom Salts?
They mixed better and dissolved in the water better.
Why doTERRA oils?
DoTERRA has the best purity grade and best smell I can find. If you use any other brand of oils, you will need to use twice as much to get the same scent results. Also, see my bio, then go
here to sign up and order your own.
Do I have to use coconut oil?
Nope. My first dozen bombs were done without oil. They crumbled or cracked, were harder to pack, and didn't mix as nicely. If you are allergic to coconut, pure olive or grapeseed oil will do, though not as well.
Why not mix all the dry and wet ingredients up at once?
It's a lot harder to get a big batch evenly wet and colored and oiled. It also dries out before you can possibly get it all formed. 3 cups of mixture is about the most I have successfully kept evenly wet through the whole process.
Can I use a plastic mold?
You can. I tried. I wouldn't try again. They crack too easily.
Can I use a silicone mold?
I don't have any advice for using them; I haven't tried yet. I know you can get some really fun shapes, but I would be worried about 1) the oils soaking into the silicone (so don't use the mold for food afterwards), and 2) getting enough pressure to get a good, solid shape. Some silicone molds come with a hard shell, that would be worth trying. I also don't know if those would be better popped out quickly, or left to dry in the mold. I'll have to do a follow-up sometime, if I can get ahold of some molds to try out.
Don't see your question? Post it! If I have an answer, I'll update the FAQ's with it.
Recipies
Summer Garden
2 drops Peppermint
2 drops Cedarwood
2 drops Petitgrain
2 drops Ginger
2 drops Basil
Cold Buster
5 drops Breathe Blend
5 drops OnGuard Blend

Post Workout Relax
5 drops Deep Blue Blend
5 drops Lavender
(Note: these are small bombs. These oils are quite potent. A mini bomb seemed to be all that was needed)
Balance
5 drops Balance Blend
5 drops Frankincense
Comforting
5 drops Forgive Blend
5 drops Clove
Citrus Cheer
4 drops Lemon
4 drops Wild Orange
3 drops Cheer Blend
OnGuard
10 drops OnGuard Blend
Passion


